How to Change DNS on Windows to 1.1.1.1
Overview
Section titled “Overview”Changing your DNS (Domain Name System) settings can help improve your browsing speed, enhance security, and even allow access to blocked websites. This guide will walk you through the steps to change your DNS settings on a Windows computer to use Cloudflare’s DNS service (1.1.1.1).
Prerequisites
Section titled “Prerequisites”- A Windows computer (Windows 10/11 or earlier versions).
- Administrative access to the computer.
Step-by-Step Guide
Section titled “Step-by-Step Guide”Method 1: Change DNS Settings via Control Panel
Section titled “Method 1: Change DNS Settings via Control Panel”- Press
Windows + Rto open the Run dialog box. - Type
ncpa.cpland pressEnterto open the Network Connections window. - Right-click on your active network connection (Wi-Fi or Ethernet) and select
Properties.
- In the
Networkingtab, scroll down and selectInternet Protocol Version 4 (TCP/IPv4), then clickProperties.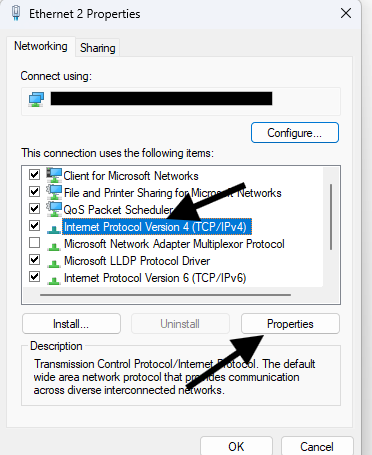
- In the new window, select
Use the following DNS server addresses. - Enter
1.1.1.1as the Preferred DNS server and1.0.0.1as the Alternate DNS server.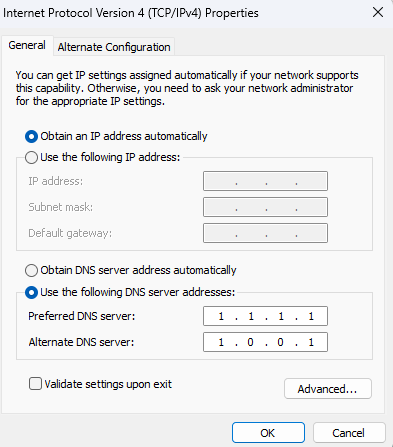
- Click
OKto save the settings, then close all windows. - Restart your computer to apply the new DNS settings.
Method 2: Change DNS Settings via Settings (Windows 10/11)
Section titled “Method 2: Change DNS Settings via Settings (Windows 10/11)”- Press
Windows + Ito open the Settings app. - Go to
Network & Internet, then selectStatusfrom the left-hand menu. - Click on
Change adapter optionsunder the Advanced network settings. - Right-click on your active network connection and select
Properties. - Select
Internet Protocol Version 4 (TCP/IPv4), then clickProperties.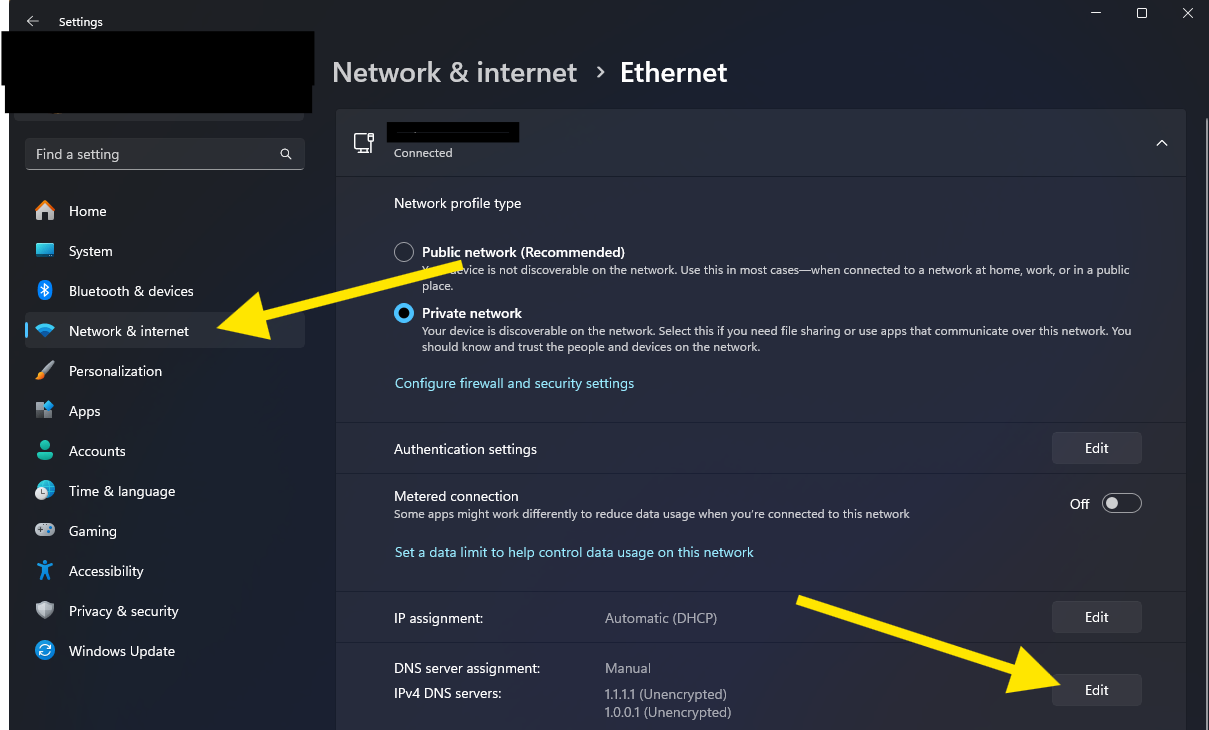
- Choose
Use the following DNS server addressesand enter1.1.1.1as the Preferred DNS server and1.0.0.1as the Alternate DNS server.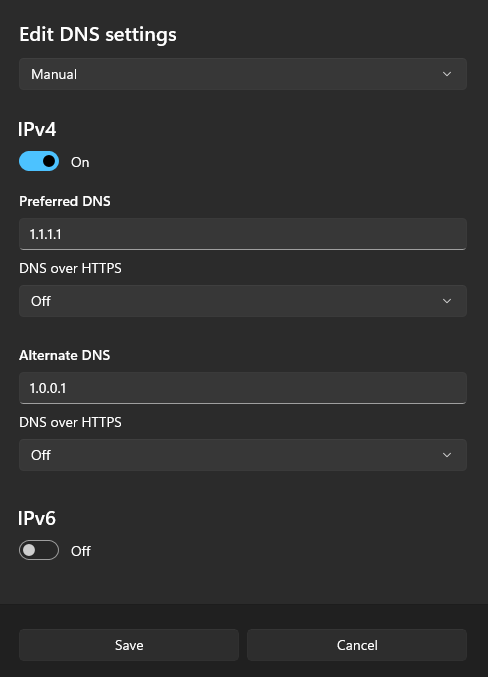
- Click
OKto save the settings, then close all windows. - Restart your computer to apply the new DNS settings.
Method 3: Use Secure DNS in Chrome and Select Cloudflare as the Provider
Section titled “Method 3: Use Secure DNS in Chrome and Select Cloudflare as the Provider”- Open Google Chrome.
- Click on the three-dot menu in the top-right corner and select
Settings. - Scroll down and click on
Privacy and securityin the left-hand menu. - Click on
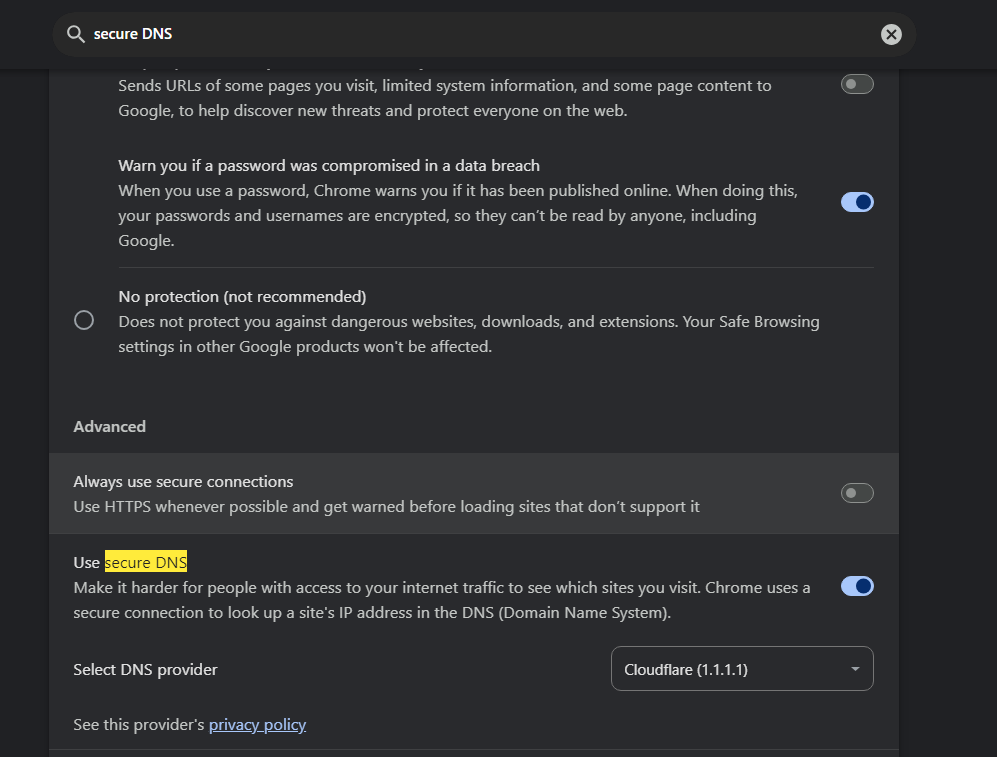
Security. - Scroll down to the Use secure DNS section and toggle it on.
- Choose
Withfrom the drop-down menu, and select Cloudflare (1.1.1.1) from the list of providers. - Close the Settings tab. Your browser is now configured to use Cloudflare’s DNS via Secure DNS.
Troubleshooting
Section titled “Troubleshooting”If you experience any issues after changing your DNS settings, you can revert to your original settings by selecting Obtain DNS server address automatically in the DNS configuration window.
Conclusion
Section titled “Conclusion”You have successfully changed your DNS settings to Cloudflare’s DNS (1.1.1.1) and configured Chrome to use Secure DNS with Cloudflare. This should improve your internet browsing speed and security. If you encounter any issues, feel free to revert to the default settings or explore other DNS options.
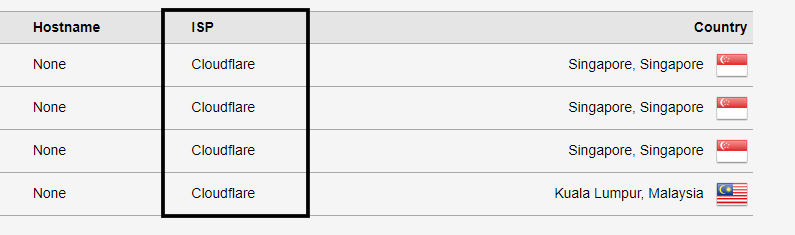
Verification
Section titled “Verification”To verify that your DNS settings have been successfully changed to Cloudflare’s DNS, follow these steps:
- Open your web browser and go to DNS Leak Test.
- Click on the Standard test button.
- Wait for the test to complete. The results should show that your DNS is being provided by Cloudflare (1.1.1.1).